Advanced NestJS Practices for Scalable and Maintainable APIs
Advanced NestJS Practices for Scalable and Maintainable APIs
Want to take your NestJS API skills to the next level? This in-depth guide walks you through advanced yet beginner-friendly practices to help you build scalable, modular, and maintainable APIs. Whether you're just starting or already using NestJS, you'll learn essential architectural patterns, performance tips, and clean code techniques.
🚀 Advanced NestJS Practices for Scalable and Maintainable APIs
In this article, I’ll take you step-by-step through advanced (but beginner-friendly) practices that will make your NestJS projects more scalable, secure, and developer-friendly.
Let’s get started.
🧱 1. Modular Architecture That Actually Scales
📌 What’s a “module” in NestJS?
A module in NestJS is a way to organize your app into separate pieces—each responsible for a specific feature. It’s like a folder that contains everything related to one domain: controllers, services, models, etc.
👎 The Beginner Mistake:
When starting out, developers often put too much in the AppModule or combine unrelated features.
✅ Better Practice: Feature-Based Modules
Organize your app by features instead of technical layers:
src/
├── auth/
│   ├── auth.controller.ts
│   ├── auth.service.ts
│   └── auth.module.ts
├── users/
│   ├── users.controller.ts
│   ├── users.service.ts
│   └── users.module.ts
Each module is self-contained. This:
- Keeps your code clean
- Makes it easier to test
- Helps teams work in parallel
- Enables lazy loading in the future
🧠 2. Using Dependency Injection (DI) Intelligently
📌 What is Dependency Injection?
Instead of creating classes and services manually, NestJS provides them for you using its built-in DI container. It automatically injects what you need.
constructor(private userService: UserService) {}
NestJS sees UserService in the constructor and gives you the ready-to-use instance.
✅ Best Practices:
- Inject interfaces (if possible) to make testing easier
- Create shared services for things like logging, so you don’t repeat code
- Avoid circular dependencies by splitting shared logic into separate modules
Example: Creating a reusable logging service
@Injectable()
export class AppLogger {
  log(message: string) {
    console.log(`[APP] ${message}`);
  }
}
Now, instead of writing console.log everywhere, inject and use AppLogger. This makes replacing or upgrading the logging system easier later.
🛡️ 3. Guards, Interceptors, and Pipes
📌 What are they?
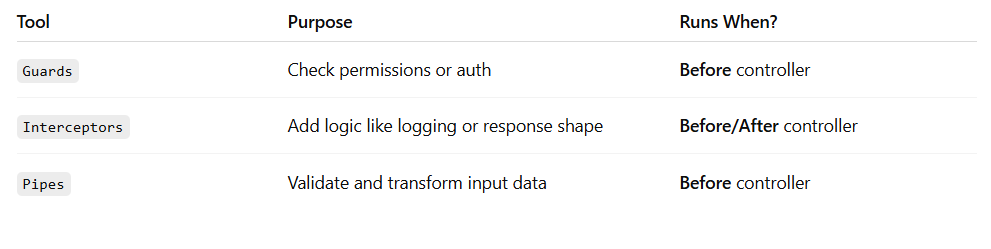
Example 1: Auth Guard (to protect routes)
@Injectable()
export class AuthGuard implements CanActivate {
  canActivate(context: ExecutionContext): boolean {
    const req = context.switchToHttp().getRequest();
    return !!req.user; // Allow access only if user exists
  }
}
Example 2: Validation Pipe (to auto-validate DTOs)
@UsePipes(new ValidationPipe())
@Post()
createUser(@Body() dto: CreateUserDto) {
  // dto is already validated and transformed
}
These tools help you keep your controllers clean and separate concerns.
🛠️ 4. Custom Decorators (Cleaner Code)
📌 What is a Decorator?
A decorator is like a label or tag that adds extra functionality to a class, method, or parameter.
NestJS comes with built-in decorators like @Body(), @Param(), @Injectable(), etc.
✅ Use Case: @CurrentUser()
Instead of this (repetitive):
@Get()
get(@Req() req) {
  return req.user;
}
Do this:
export const CurrentUser = createParamDecorator(
  (_, ctx: ExecutionContext) => {
    const req = ctx.switchToHttp().getRequest();
    return req.user;
  },
);
Then in the controller:
@Get()
get(@CurrentUser() user) {
  return user;
}
Now every controller stays clean and readable. Great for teamwork and maintenance.
🌐 5. Environment Configuration and Validation
📌 Why It Matters:
Most apps rely on .env files for configs like database URL, ports, API keys, etc. If any variable is missing or invalid, it can crash your app.
✅ Solution: Use @nestjs/config + Joi or Zod
ConfigModule.forRoot({
  isGlobal: true,
  validationSchema: Joi.object({
    DATABASE_URL: Joi.string().required(),
    PORT: Joi.number().default(3000),
  }),
});
This ensures:
- Your app won’t start if configs are wrong
- You catch issues early
- You get type-safe access to environment values
📄 6. Global Exception Handling
📌 Why You Need It:
NestJS will throw HTTP errors when something goes wrong, but by default they’re raw and inconsistent.
✅ Build a Global Exception Filter:
@Catch(HttpException)
export class GlobalHttpExceptionFilter implements ExceptionFilter {
  catch(exception: HttpException, host: ArgumentsHost) {
    const ctx = host.switchToHttp();
    const response = ctx.getResponse();
    const status = exception.getStatus();
    const message = exception.getResponse();

    response.status(status).json({
      statusCode: status,
      message,
      timestamp: new Date().toISOString(),
    });
  }
}
Now every error your app throws will look clean and structured.
🔢 7. Versioning Your API
As your app grows, older clients might rely on old versions of your API. Versioning lets you add features without breaking old ones.
app.enableVersioning({
  type: VersioningType.URI, // /v1/users, /v2/users
});
Then:
@Controller({ path: 'users', version: '1' })
export class UsersV1Controller {}

@Controller({ path: 'users', version: '2' })
export class UsersV2Controller {}
Now you can support multiple versions side-by-side.
🧪 8. Writing Tests That Are Useful
Testing helps you avoid bugs, refactor safely, and speed up onboarding for teammates.
✅ Unit Test with @nestjs/testing:
describe('UsersService', () => {
  let service: UsersService;

  beforeEach(async () => {
    const module = await Test.createTestingModule({
      providers: [UsersService],
    }).compile();

    service = module.get(UsersService);
  });

  it('should find a user', async () => {
    expect(await service.findOne(1)).toBeDefined();
  });
});
Mocking can be done with libraries like jest-mock-extended or manual mocks using useValue.
⏱️ 9. Use Caching, Queues, and Background Jobs
If a task is slow (e.g., sending email, generating PDF), offload it:
- Cache: Use Redis with
@nestjs/cache-manager - Queues: Use Bull with
@nestjs/bullto handle background jobs - Events: Use
@nestjs/event-emitterto create decoupled logic
This keeps your API fast and improves user experience.
🎯 10. Developer Experience Tools
Improve team collaboration and code quality with:
eslint+prettierfor linting and formattinghuskyfor Git hooks (e.g., run tests before push)@nestjs/swaggerto auto-generate API docs
✅ Final Thoughts
NestJS is a powerful tool, but mastering it means understanding more than just controllers and services.
By using these advanced practices—like modular architecture, guards, custom decorators, testing, and background jobs—you’ll build APIs that are clean, fast, and easy to maintain.
Start with small steps, refactor as you go, and keep learning.
🔗 Bonus Resources
- NestJS Official Docs
- Awesome NestJS
- API Design Best Practices
Comments
(0)
Leave a Comment
No comments yet
Be the first to share your thoughts!